TELESCOPE OPERATION
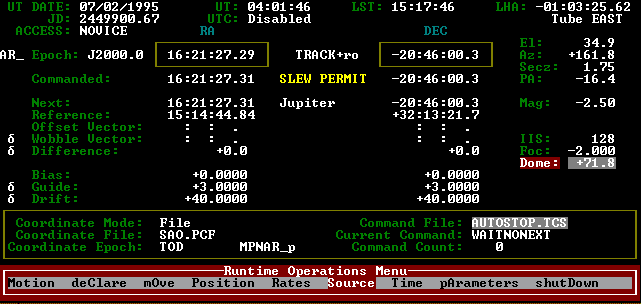
Above is a generic PC-TCS screen. You may want to refer to this image as you read this page to get a feel for where the various menus and data fields are.
1. To turn the tracking on go to the Motion menu and select Tracking. (You can also use the keyboard shortcut command alt-T.) The RA field should stop running and you should see TRACK+rf in between the RA and DEC fields. The r is a correction for atmospheric refraction and the f is a correction for tube flexture. Sometimes you will see an o in tracking readout if it is also making a correction for the object (such as the moon or a planet).
2. There are several catalogs that are pre-programmed into the software, so you will most likely not have to manually enter coordinates of an object.
Use the keyboard arrow keys to move along the bottom to Source and press enter. This will show you a menu with three options: Keyboard, PCF Catalog and User Catalog. The Keyboard selection is obviously the selection you want for manually entering coordinates. This will be covered in detail in a later section.
Under PCF Catalog, you will see several options:
FK5
FLEX2000
NGC2000
OKESTONE
PPM
SAO
YBSC
Under User Catalog, you will see the following options:
BLANK
CBA
CBAWEST
LANDLT83
LANDLT92
MESSIER
SCHMIDT
SORTFK5
STDCLUD
Most observers will be using the NGC2000, YBSC (Yale Bright Star Catalog) or Messier Catalog. Highlight the catalog you wish to use and hit enter. You should see your selection on the lower left part of the screen next to Coordinate File (refer to screen capture image). If instead you see an object's rise and set times, hit the F4 key to see the Coordinate File information box.
To choose the object from the catalog, move over to the Position menu and select Next (the top option). This will pop up a screen with the names and coordinates of the objects in that catalog. To move to the individual object you want you can just type in the catalog number and hit enter, which will skip you forward to that object. If you want to browse through a catalog, you can use the down arrow keys to move within a screen and the Page Up and Page Down keys to advance or move back by whole pages (approximately 10 objects per page). Once you have the object you wish to observe highlighted on the catalog page, hit enter. Your object should now appear to the right of the Next label on the TCS screen. (Jupiter is the object queued up on the above sample image.)
If the object you want to observe is highlighted red, then it is below the limits set by the software and the telescope cannot move to it. If you want to check how long until the object is visible to the telescope, you can choose it (the Next label will be red) and hit the F4 key to display the rise and set times. The rise time will tell you how long until the telescope can safely move to the object (approximately 15 degrees above the eastern horizon).
If your object is fairly far over in the west, you may want to check the set time to make sure you have enough time to observe it before the telescope hits the western limit.
Planets, asteroids, and comets can be found directly under the Position menu.
3. Use the Move menu and choose Next to move to the next object. You can also use the keyboard shortcut Alt-N. Make sure the ladder is clear of the telescope and no one is looking through the eyepieces. If you are using the CCD, keep a close eye on the cable that runs between the computer and the camera as the telescope slews into position.
4. Before moving the dome, double-check that you have disconnected the power cord between the dome and the control box used to raise the slit. Use the switch on the wall to rotate the dome slit to the correct position (fig. 1). (Disregard the buttons on the box to the right, next to the fire alarm, they no longer work.) Keep an eye on the cable as you rotate the dome.
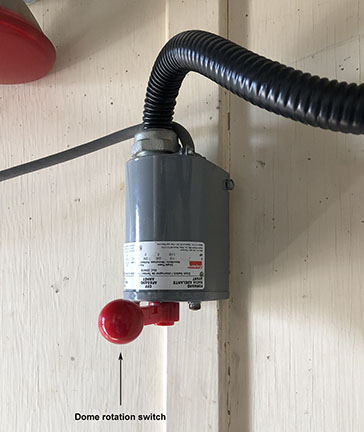 fig. 1
5. Once the telescope has finished moving, you can use the fine controls on the hand paddle to center it up in the field of view.

